• Skip to primary navigation
  • Skip to main content
  • Skip to primary sidebar

The Urban Penguin

The Urban Penguin - Linux Training

  • Home
  • About
  • Programming
    • Master Editing Text Files Using VIM
    • Learn Shell Scripting with BASH
    • PERL Scripting in Linux
    • Ruby Scripting in Linux
    • Scripting with PowerShell
    • Learn C Programming using Linux and the Raspberry Pi
    • General Java Tutorials
    • Java 7 OCA Exam 1ZO-803
  • OS Tutorials
    • Red Hat and CentOS Training
      • Red Hat Enterprise Linux System Administration 1 – RH124
      • RHCSA – System Admin 2 – RH134
      • RHCE – EX294 – Automation With Ansible
    • Learning Ubuntu
    • LPI Training
      • LPI Linux Essentials
      • LPIC-1 Linux Administrator
      • LPIC-2 Certified Linux Engineer
      • LPIC-3 Senior Level Certification
        • LPIC-3 Exam 300 : Mixed Environments
        • LPIC-3 Exam 303 : Security
        • LPIC-3 Exam 304 : Virtualization and High Availability
    • Linux Technologies
      • Apache HTTPD Server
      • Learning PHP
      • Learning PUPPET
      • Learning SAMBA
      • Linux File-Systems
      • Monitoring with Nagios Core
      • MYSQL
      • openLDAP Directories on Linux
You are here: Home / Linux / LPIC-1 Exam 101 / 102.1 Design hard disk layout Part 4

102.1 Design hard disk layout Part 4

January 19, 2014 by The Urban Penguin

Weight2
DescriptionCandidates should be able to design a disk partitioning scheme for a Linux system.

Key Knowledge Areas:

  • Allocate filesystems and swap space to separate partitions or disks.
  • Tailor the design to the intended use of the system.
  • Ensure the /boot partition conforms to the hardware architecture requirements for booting.
  • Knowledge of basic features of LVM.

The following is a partial list of the used files, terms and utilities:

  • / (root) filesystem.
  • /var filesystem.
  • /home filesystem.
  • swap space.
  • mount points.
  • partitions.

In part 3 we looked at mounting disk partitions and planning filesystems

Using LVM Logical Volume Managment


LVM can simplify your disk management by allowing you to easily expand disk space across multiple disks. So if the root file-system was running out of space we can simple add more space into LVM.

Expanding a file-system across many disks does not add fault-tolerance and you may need to consider the underlining RAID structure of the disks you add in.

Using the command line is quick, effective and essential in Linux administration. Using LVM, Logical Volume Management, allows for volumes to dynamically grow as extra partitions or disks can be supplied to support the existing volume groups. These are common on SANs and in our data-centers. The video then takes you through the creation of a logical volume structure on SUSE Linux Enterprise Server 11 from start to finish. Don’t forget to make sure the LVM service is enabled.

There are three levels of management

  • Physical Volumes : The disks or partitions we use
  • Volume Groups : The Consumes than mange the disk space
  • Logical Volumes : The areas we format as file systems

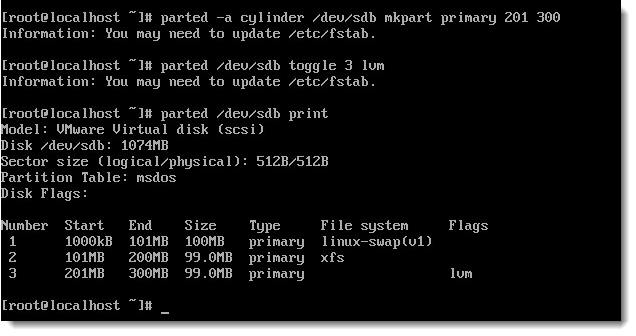
The partitions we add in have already been created and are of partition ID 8e when creating in fdisk. If you are using parted LVM partition can be created from the command line

 parted -a cylinder /dev/sdb mkpart primary 201 300
 parted /dev/sdb toggle 3 lvm
 (in this case it is partition 3 that we want to set to lvm)
 parted /dev/sdb print

 chkconfig -a boot.lvm
 pvcreate /dev/sda14
 pvcreate /dev/sda15
 vgcreate vg1 /dev/sda14 /dev/sda15
 lvcreate -L 1000M -n data4 vg1
 chkconfig -a boot.lvm
 mkfs.ext3 /dev/vg1/data4
 echo "/dev/vg1/data4 /export/data3 ext3 defaults 0 2" >> /etc/fstab
 mount -a

As well as the create command we can then use the extend  style commands to add more space to existing volume groups and volumes


Share this:

  • Click to share on Twitter (Opens in new window)
  • Click to share on Facebook (Opens in new window)
  • Click to share on LinkedIn (Opens in new window)
  • Click to share on Reddit (Opens in new window)
  • Click to share on Pinterest (Opens in new window)
  • Click to share on Tumblr (Opens in new window)
  • Click to print (Opens in new window)

Filed Under: LPIC-1 Exam 101

Primary Sidebar

Newest Video

The Urban Penguin On Youtube

Categories

Pages

  • About The Urban Penguin
  • Contact Us
  • Linux Technologies
    • Apache HTTPD Server
    • Learning PHP
    • Learning PUPPET
    • Learning SAMBA
    • Linux File-Systems
    • Monitoring with Nagios Core
    • MYSQL
    • openLDAP Directories on Linux
  • LPI Training from The Urban Penguin
    • Complete Linux Essentials
    • Live and Pluralsight hosted courses
    • LPI Linux Essentials
    • LPI Linux Essentials for Raspberry Pi
    • LPIC-1 Linux Administrator
    • LPIC-2 Certified Linux Engineer
    • LPIC-3 Senior Level Certification
      • LPIC-3 Exam 300 : Mixed Environments
      • LPIC-3 Exam 303 : Security
      • LPIC-3 Exam 304 : Virtualization and High Availability
  • Online Instructor-led Courses
    • Bash Scripting Masterclass
    • Nftables Masterclass
    • Red Hat Enterprise Linux System Administration 1 – RH124
    • SELinux Masterclass
  • OpenStack
    • Citrix Videos
    • Pluralsight
    • Raspberry Pi Tutorials
    • Udemy
  • Operating System Tutorials
    • Learning SUSE
    • Learning Ubuntu
    • Linux Foundation Training
    • Red Hat and CentOS Training
      • RHCE – EX294 – Automation With Ansible
      • RHCSA – System Admin 1 – RH124
      • RHCSA – System Admin 2 – RH134
    • Solaris 11 OCA 1ZO-821
  • Scripting – the power of repetition!
    • General Java Tutorials
    • Java 7 OCA Exam 1ZO-803
    • Learn C Programming using Linux and the Raspberry Pi
    • Learn Shell Scripting with BASH
    • Master Editing Text Files Using VIM
    • PERL Scripting in Linux
    • Ruby Scripting in Linux
    • Scripting with PowerShell

© 2022 The Urban Penguin · All Rights Reserved