Weight: 2
Description: Various types of users on a Linux system.
Key Knowledge Areas:
Root and Standard Users.
System users.
The following is a partial list of the used files, terms and utilities:
/etc/passwd, /etc/group, id, who, w, sudo.
Nice to know: su.
The predominate administrative account on Linux systems is the root account with the user ID (UID) of 0. To manage the Linux system you will need access to this account either directly or via sudo. As we discuss this further you will see that sudo is the preferred method of delegated administration as, in this way, the administrative users do not need access to the root password. Whereas logging into the system directly as root or using the substitute user command, su, knowledge of the root password is required.
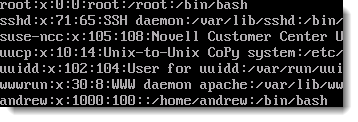
Each Linux host must, at the minimum, have a local root account defined in the /etc/passwd file. The local user account store is /etc/passwd, passwords, on the other hand passwords are usually held in the /etc/shadow file. Each user, including the root user will need both a UID and a GID group ID. Users must belong to a minimum of one group; some systems such a Red Hat run a private group system where users belong to their own private groups, other systems including SUSE have a public group system where users belong to a shared groups : users. Local groups are recorded in the file /etc/group With root privileges users can be created and managed with the command useradd and groups with groupadd. Even though you would be expected to use the tools provided to manage users and groups there is nothing stopping changes being made directly to the appropriate file.
These are text files writable by the root account. The seven fields of the passwd file are delimited with a colon and are described as:
- user name
- password or a single x denotes the password is stored in /etc/shadow
- UID
- GID
- Comments
- Home directory path
- Default user shell, (command line environment)
To display information about a user account, whether your own or another account the command id , (/usr/bin/id). By default the command will display the user name uid and gid and secondarygroups, but more specific information can be honed in upon with additional switches. The command finger, (/usr/bin/finger), can be used to display further information about users account information. The following screenshots first show the out from id then finger:
To return information on currently logged in users, perhaps if you need to bring a server down for maintenance, the use of the commands who (/usr/bin/who) or w (/usr/bin/w) are useful. With typical Linux humor the shorter command w, provides the more verbose output.
Controlling access to sudo, (/usr/bin/sudo) ,and what you are allowed to do with it, is a task that the root user will achieve through editing the file /etc/sudoers. So that mistakes are less likely to occur, root is encouraged to edit the file using visudo (/usr/sbin/visudo ) ; as this program closes the file is syntax checked helping prevent errors. Users can be delegated rights to run certain commands though the /etc/sudoers file; this way knowledge of the root password is not required when administering the host but the commands must be prefaced with sudo. On some systems, such as Ubuntu, the root account password is not shown during installation and all tasks are managed thorough sudo. This, is many ways is a correct administration model avoiding directly accessing the root account.
For ease of access to many administration commands consider adding the /sbin and usr/sbin directories into the PATH variable of your delegated administrators. In this way the previous command in the screenshot could be reduced to : sudo useradd -m bob .
When required if you have access to the root password you may use the su (/bin/su) command to substitute your current user id with the root user ID. (note the command su can be used to access any account you know the password to , not just root). It is possible to disallow remote access via SSH to root, you can still logon on as a standard account and su to root as required.


