[custom-header-login]
Installing MongoDB on Ubuntu 14.04
Evermore we are seeing the rise in so called NoSQL Database Servers supporting the needs of Big Data. First of all we need to get some understanding of what we mean by NoSQL before we look at installing MongoDB, a NoSQL Database Server.
NoSQL
Well if SQL is the structured query language then NoSQL is unstructured. For example, or at least a quick and easy demonstration:
- in SQL to select data from a table we would use: SELECT * FROM employees
- in NoSQL we would select data similar data using: db.employees.find()
I do agree this is very much semantics; however there is less in the Query Language with NoSQL and more in the way the data is stored.
Another difference demonstrating the reduced structure is that in SQL the table and schema has to be defines before we add data to it. In SQL this would be the table with defines columns. In NoSQL we use collections and the collections store documents instead of rows. A collection is created when a document is added to it. If you ere add to a document to an existing collection and the new document were to have additional fields, (elements is the document array), those fields are would be dynamically added.
Installing MongoDB
We will be installing MongoDB onto a Ubuntu 14.04 LTS system. In this demonstration we will look at installing MongoDB from the standard repositories. In a later tutorial we can see how this is achieved using the latest version of MongoDB by adding their repositories.
The standard repo will supply version 2.4 of MongoDB. Later versions of the database use a different format to the configuration file; when we edit the configuration we use the 2.4 version as supplied by Ubuntu. When we use the latest version of MongoDB supplied by MongoDB.org we will see the new style configuration
It is important to note that MongoDB will not start with the default configuration unless you have in excess of 30GB of free disk space available to it. For a live system that is not an issue but if you are installing MongoDB for testing and learning purposes you may hit a stumbling block here. We will show how to adjust the configuration to support less disk space so that you can run and test MongoDB with minimal configuration.
To install MongoDB 2.4 from the standard repositories:
$ sudo apt-get update
$ sudo apt-get install mongodb

The mongodb package is a meta-package that will install the server, client and shared components.
Server Fails to Start
Running through this you will now be rather annoyed with me thinking this is just another blog that hasn’t been tested or written by someone who has never used the database. The server will fail to start and if we check the server script we will see that the server failed to start.
Using the following command we should see that the server has failed:
$ /etc/init.d/mongodb status
 If we check the log file which will be /var/log/mongodb/mongodb.log we should be able to see that it failed because of insufficient disk space:

Fix the Configuration
One solution would be to give an extra 30GB of disk space to the database directory; alternatively we could configure the option smallfiles. I kind of like the latter option for a small test system. The configuration file for version 2.4.9 that we use in /etc/mongodb.conf and is a straightforward flat file. Later versions change to more hierarchical settings within the configuration.
We need to edit this file as root or with sudo and add in the following line:
smallfiles = true
The file should look something similar to this:
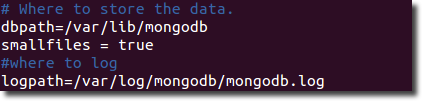 Note: This is for the 2.4 version on MongoDB and earlier later versions use a different format.
Start the Server and Test Access
With the settings saved we can now start the MongoDB server:
# /etc/init.d/mongodb start
# /etc/init.d/mongodb status
The server should now report as being running. By default it will listen on the localhost interface only. We can connect to the server using the mongo shell client. Just type mongo as a standard user:
$ mongo
The output should be similar to the following screenshot:

We can test the version later, even though the client does report when it starts:
db.version()
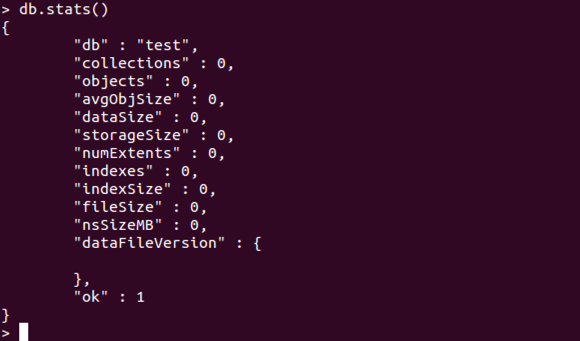
We connect to the test database by default and we can return data on that using:
db.stats()
We can see the output in the following screenshot:
We can use the command exit to leave the mongo shell client.