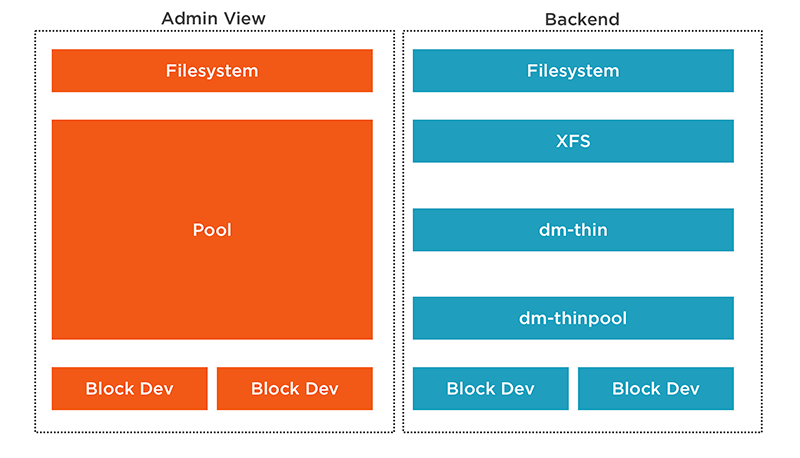
In this blog we dive into Stratis storage management, brand new in RHEL 8. Red Hat Enterprise Linux is built on a foundation on solid reliability, and storage is just as importance as any other layer in Linux. Whilst new technologies may come and go in Linux, the current volume management with LVM and the XFS filesystem are robust and tested resources. Red Hat are not putting these old-timers out to grass at all. Far from it, they are feeding new life into these products by adding in Stratis. Stratis makes use of the existing technologies we have but adding them in to a unified management tool.

To install stratis storrager mangement we need to add the following products:
# yum install -y stratisd stratis-cli
The service will need to be started and enabled:
# systemctl enable --now stratisd
From the command line we can manage stratis volumes by first adding storage to a pool, much like volume groups in LVM.
# stratis pool create pool1 /dev/sdb
# stratis pool list
Name     Total Physical Size  Total Physical Used
pool1                  8 GiB               52 MiB
If we need to extend the pool we can add more block devices to the pool. We can now add in the 3rd disk. We can also list block devices that make up the pool storage, as well as the pool size:
# stratis pool add-data pool1 /dev/sdc
# stratis blockdev list
Pool Name  Device Node    Physical Size   State  Tier
pool1      /dev/sdb               8 GiB  In-use  Data
pool1      /dev/sdc            8.25 GiB  In-use  Data
# stratis pool list
Name     Total Physical Size  Total Physical Used
pool1              16.25 GiB               56 MiB
So, this was all very quick and easy. We still don’t have the filesystem yet. When we create a new filesystem, a little like a Logical Volume that is formatted with XFS, we do not specify the size. The filesystem acts as a Thin LVM Volume that can dynamically grow to the Pool Size. Being thinly provisioned from the start, we only use the space that we need. In the following we create a new filesystem fs1, each new filesystem will take 500MiB or so of storage space from the pool for the XFS log/
# stratis filesystem create pool1 fs1
# stratis pool list
Name     Total Physical Size  Total Physical Used
pool1              16.25 GiB              602 MiB
# stratis filesystem list
Pool Name  Name  Used     Created            Device              UUID
pool1      fs1   546 MiB  Nov 26 2019 10:19  /stratis/pool1/fs1  2c7b38ae420941dd8f2f4fe663e3f7c8
The stratis objects are created below the /stratis directory, we can list the UUID of the filesystem using the familiar lsblk command:
# blkid /stratis/pool1/fs1
/stratis/pool1/fs1: UUID="2c7b38ae-4209-41dd-8f2f-4fe663e3f7c8" TYPE="xfs"
Now the big test, let’s create mount points again to test, we will create two directories, one for live and current data and another we can use for backups:
# mkdir -p /data/{live,backup}
# mount UUID=”2c7b38ae-4209-41dd-8f2f-4fe663e3f7c8″ /data/live
# find /usr/share/doc/ -name “*.html” -exec cp {} /data/live \;
We now have live data in the mount point. Another feature of LVMs that easily ports to stratis is snapshots. Point-in-time copies of the data. Creating a snapshot can be for a short time, perhaps for a backup, or longer time if required. Only the changed data needs to be physically stored in the snapshot. We can now snapshot fs1 to a new snapshot we call snap1:
# stratis filesystem snapshot pool1 fs1 snap1
# stratis filesystem list
Pool Name  Name   Used     Created            Device                UUID
pool1      fs1    548 MiB  Nov 26 2019 10:19  /stratis/pool1/fs1    2c7b38ae420941dd8f2f4fe663e3f7c8
pool1      snap1  548 MiB  Nov 26 2019 10:32  /stratis/pool1/snap1  b5b522bb460e45218e9c1a246a1b7bfd
The snapshot can be mounted independently, we will mount it to the backup directory:
# blkid /stratis/pool1/snap1
/stratis/pool1/snap1: UUID="b5b522bb-460e-4521-8e9c-1a246a1b7bfd" TYPE="xfs"
# mount UUID="b5b522bb-460e-4521-8e9c-1a246a1b7bfd" /data/backup
# ls /data/backup
bash.html              hwdata.USB-class.html  kbd.FAQ.html                      sag-pam_faildelay.html   sag-pam_time.html
bashref.html           identifier-index.html  Linux-PAM_SAG.html
We can see that a snapshot is pre-populated with data, being the point-in-time copy of the original filesystem. If we delete content from the original the snapshot data is retained:
# rm -f /data/live/*
# ls -l /data/backup/
total 3700
-rw-r--r--. 1 root root 342306 Nov 26 10:29 bash.html
-rw-r--r--. 1 root root 774491 Nov 26 10:29 bashref.html
The simplicity is what Administrators have been asking for but Red Hat have not compromised on reliability by using tried and tested elements for the Stratis storage management stack.
If we have now finished with the snapshot we can delete the snapshot filesystem once it is unmounted, this will release the space used by the filesystem and the xfs.log:
# umount /data/backup
# stratis filesystem destroy pool1 snap1
Removing the snapshot has no effect on the original filesystem.
Persistent mounting of any filesystem is via the /etc/fstab file. The entry for stratis filesystems must contain an option to wait for the stratis daemon:
UUID=<uuid> /mnt xfs defaults,x-systemd.requires=stratisd.service 0 0
The video follows:
